Farmhouse Table Details
If you’re reading this post for instructions….you should check out my revised plans in a newer post found here; http://tommyandellie.com/?p=2582
This Dining Room Table has been a labor of love….so to speak. It’s been fun to try out new tools and new techniques and I’ve learned a ton for the next time around. This has really felt like the first time building something this substantial from the ground up. Here’s how it all started.
I recently came across this blog, ana-white.com. It’s an amazing resource for do-it-yourself builders with great detailed building plans. So far, I’ve used a couple plans for inspiration and techniques but have yet to follow one to a “t.” This is the plan that lead to motivating me to build the table; http://ana-white.com/2009/12/plans-farmhouse-table-knock-off-of.html. I also went to Restoration Hardware and checked out the table with my own eyes. I noticed a couple of crucial differences between the Ana-White plan and the actual Restoration Hardware table that I wanted to implement. The Restoration Hardware table used big wide planks for the tabletop (so I used 4-2x12’s for the top), they also had big beefy table legs and cross beam (so I used 4x4’s), and I also really liked that they had two 15” extensions that could be added on (so I included that in my design).
The big problem with wanting to use 4x4’s for the legs is that nobody really sells 4x4’s unless they are pressure treated. So I had to purchase a majority of the wood from a local mill, Siewers Lumber, which meant that it cost more than just using framing 2x4’s.
The first thing that I did was cut the 2x12’s, 2x8’s (for the breadboards), and 4x4’s to length. I then notched the 4x4’s out. To notch it out, I used my table saw. I set the blade to the height that I wanted and then made the first cut and the last cut. I then made subsequent cuts in between, hammered out the little slivers, and then swerved the 4x4’s around on the table saw to smooth it all out. I strategically left about a 1/4” for the 4x4’s to still out just enough to give it some definition. I did the same for the 2×4 that was the stretcher along the bottom. Once I did this, it created a really strong foundation that would hold together by itself. This is what it looked like.
Once I dried fit it together, I went back and tweaked it some more to make it more subtle. I also then began the process of distressing it all which included banging the legs on the concrete at the end of my driveway, hammering chains against the wood, hammering the wood, scratching with screws, etc. I also put a first coat of stain on things. Once the base was done, I focused on the tabletop. I used my Kreg jig for the first time to drill all the pocket holes on the underside of the 2x12’s. I spaced them out about every 12”. My plan was to construct the entire tabletop outside and then after I put together the base in the dining room, that I would move the massively heavy tabletop onto the base. The planks were real heavy but one-by-one, I would place them together, clamp them down, clamp them together, and then screw in all the pocket screws. This was my first time clamping things together….and I love it. I don’t think I’ll build anything else again without clamping.
Anyways, I didn’t take any pictures of that step or some of the next couple steps. To complete the base, I needed to cut, distress, stain, and use the Kreg jig to drill holes, for the side aprons and end aprons. I moved all of these pieces into the empty dining room and constructed the base. I also added some 2×4 support beams about every 24”. Once I had all that together, we hoisted the entire tabletop onto it. Here’s what that looked like;
I then attached the bread boards using all my clamps. Once that was done, I secured it to the base from the underneath. I countersinked some screws through the 2×4 supports and then also had some pocket holes through the 4x4’s. Once I had it all together, I decided to sand down some of the areas that weren’t quite flush.
I put another coat of stain on it to finish it off (Dark Walnut). I ended up not liking it and thinking that it was too dark. So I decided to sand the entire tabletop down.
After a test strip with Briwax, Special Walnut, and American Classic……I decided to go with the original Dark Walnut stain. But the good news was that it made the distressing a little more subtle. I also learned that I love this Briwax wood wax. So after a coat of stain, I used the Briwax (Light Brown) to finish off the table top. The awesome thing about the Briwax is that it makes the table real smooth and gives it a nice consistent shine.
I did the same finish on the 15” extensions. BTW, those were just two 2x8’s screwed together with the Kreg Jig. I then attached some 2×2 strips on the underneath to slip into the table. I notched out the base 1.5”x1.5” to allow for a nice tight fitment. I used my router to get it to the right depth. I also used the router for rounded off edges on everything. Here’s the table with the extensions (total table lenth with extensions is 126”!!!!!)
Here’s how the extensions work;
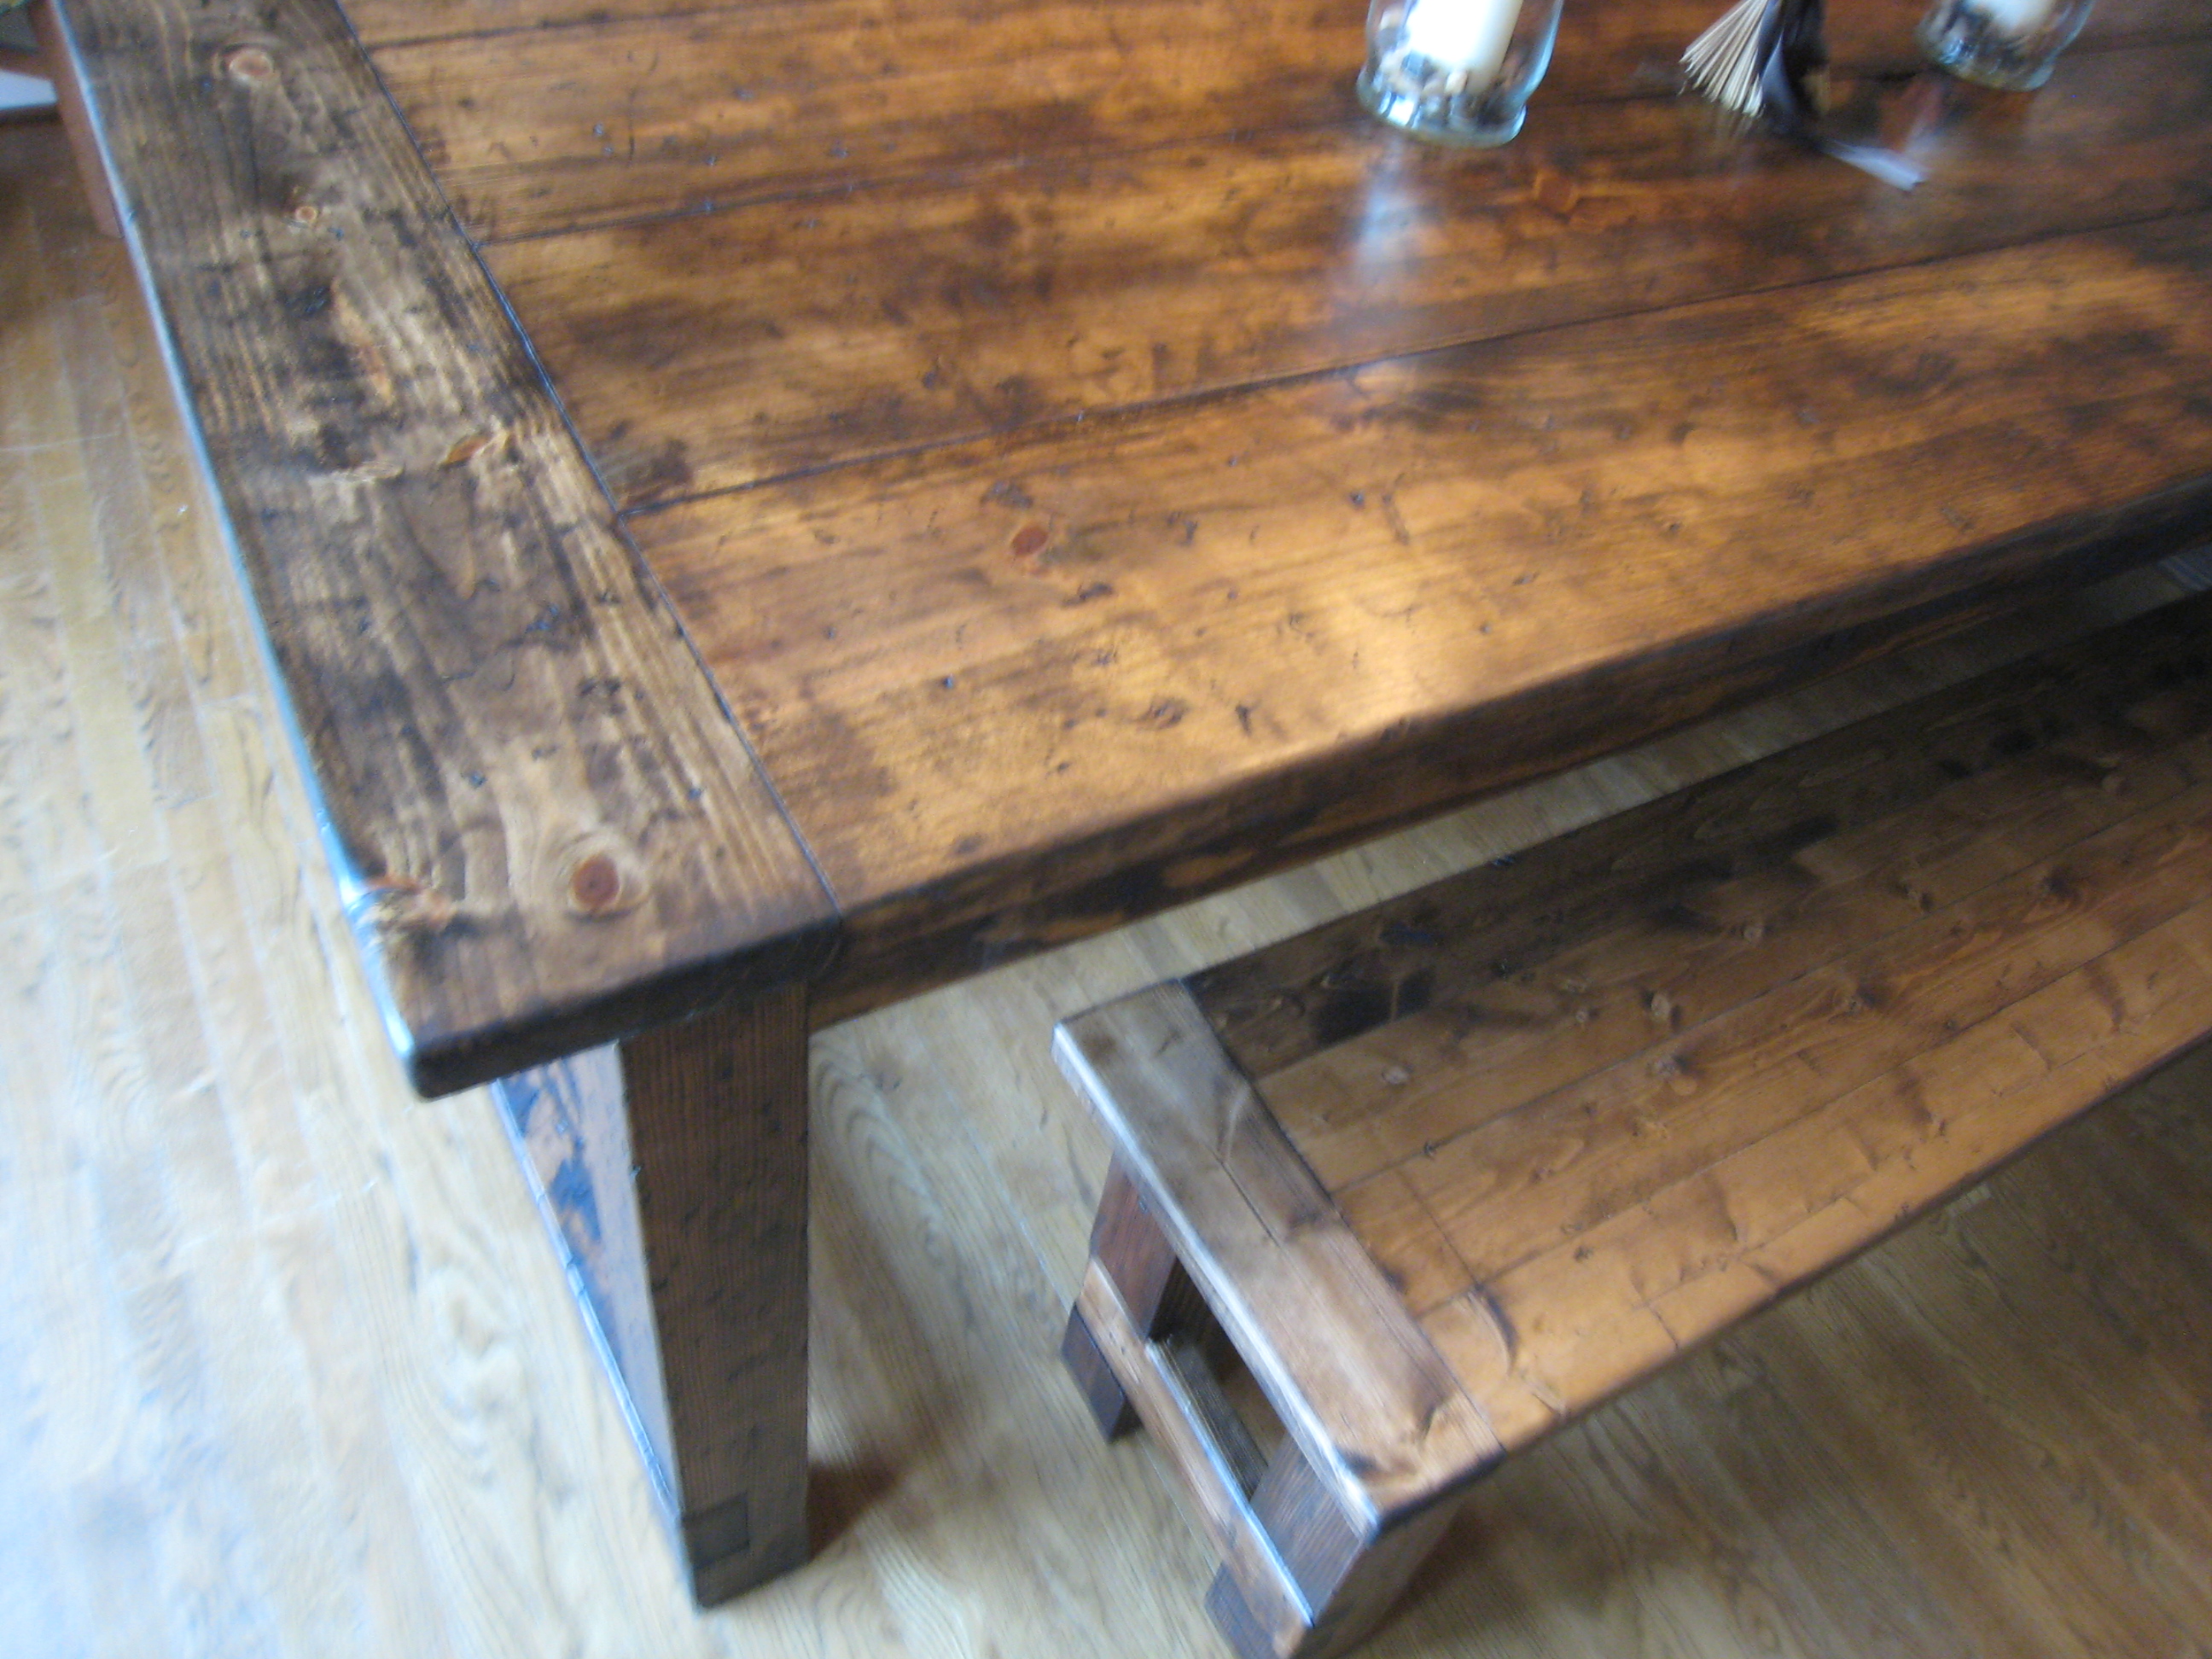
Here’s some other close-ups;
And here’s some of my favorite spots. I think these add some awesome character to the table;
UPDATE!
HERE’S SOME NEW PICTURES OF THE TABLE ALONG WITH OUR NEW SLIPCOVERED PARSON CHAIRS, SEEN HERE, A NEW AREA RUG, AND A NEW HURRICANE.
Blue Prints can be found here.


elliesibiga
38
4


Just a quick question….Structurally speaking, is it a must to have to bottom cross bar down the middle of the table? I see it as a foot rest more than anything, but wanted to get your advice.
Thank you for any thoughts!
What kind of hardware did you use?
Pingback: DIY Friday: Rustic Farmhouse Dining Table | BetterDecoratingBible
what are the dimensions of the table when the four chairs on one side are in use?
I LOVE the way your table turned out and the extensions are great! Here’s to hoping I can get my overworked already husband to get on board with this project. Thanks for being willing to share how you did this and answer so many questions. Just curious, how the heck did you end up with the same parsons chairs as Young House Love? I thought I recognized the pattern right away! I love them slip covered!
Young House Love is one of our fav’s…..and we actually live near them. So, when Ellie saw that they got them off Craigslist we searched for them real quick. I’ve sent about 4 other folks who have purchased a table from us to buy those chairs as well. The guy has a whole storage shed full of them.
Tommy, thanks for posting your table. I had been looking all over for the perfect style farmhouse table, needless to say your design was great. We built a table this evening based around your design (without stringers) it turned out great. I just wanted to take a minute to thank you from one builder to another. its all downhill from here watching the stain dry…. Thanks again
The dinning room looks amazing! I have a similar table, any chance you know the color used on your walls and were your drapes are from?
Thanks. The wall color is Martha Stewart “Mushroom” and the curtains are Silk Duponi from Pottery Barn and white sheer ones from Target.
I’m speechless! That is one amazing table and I cannot believe you built it from scratch. You put the rest of us DIYers to shame!
Thanks. Thats very nice of you to say. I’m equally impressed with all the amazing/creative/crafty DIY projects that I see others accomplish. Thanks for stopping by.
Pingback: $4 + 4 Hours « Tommy & Ellie
What grade lumber do you use for this? Framing (#2 Pine) or Finish? How much does the lumber typically cost you?
I use all kiln-dried pine from a local mill. Not sure what grade it would be considered. It’s all rough cut and then I have them dress it and rip it to size. It’s expensive stuff this way….approximately $15 – $20 for 8′ lengths in everything other than the 2×4″s. The 2×4″s are about $4/each.
Home Depot sells 2×12″s for about $8/each but you’ll have to dig through the whole pile to find one that’s straight enough to be worth it.
The picture on this post were from the first table I built…..the 4×4″s are from a lumber yard and the planks are from Home Depot. It got the job done….but now my preference is to spend the extra $ and save myself from the hard labor of making the wood work.
Hope that helps.
Awesome, thanks so much.
Also, what order do you typically do this in? Make your cuts/notches, then sand, assemble, and stain?
I typically cut/notch, distress, route the edges, drill my pocket holes, sand, assemble, sand again, and then stain.
I know that you have prolly said it a dozen times but I am trying to get a clear answer. You just set the tom ontop of the base. you dont screw it together at all?
The tabletop is screwed from the underneath. After I center it onto the table, I clamp it all down and climb under the table and screw it down. I place a ton of pocket holes along the inside perimeter of the base and a few screws go through the supports. My biggest recommendation is to make sure that you get some screws into the breadboards. If anyone ever tries to move the table,oat likely they would attempt to pick the table up from the breadboards.
Hope that helps.
Tommy
I love your table! It’s so beautifully done. My husband and I are getting ready to start our own Farmhouse Table. I found some untreated 4×4′s at Lowe’s but they say they are “green”- meaning (I think) freshly cut and a higher moisture content. I’m worried about warping etc. if I use them. I see that you use Kiln dried. Any suggestions there? Thanks so much! I love your work!
Thanks for the feedback. That doesn’t sound like something that I would recommend using. I would do some searching around and see if you can get some kiln-dried 4×4″s from somewhere else. My Home Depot and Lowe’s do not carry any 4×4″s that I would use. I called about 4 other local mills/lumber yards until I found one that actually sold kiln-dried pine. They all sold 4×4″s in Fir……but I was looking for pine.
I’m by no means an expert on this topic…..but that’s just my opinion. Hope that helps.
Hi -I’m so glad I found you! I’m having a local company help with getting the table and bench put together and I’m really excited. I’ve never stained wood and I’m not a crafty gal, but will be willing to give it my best shot. Any pointers on the stain and method? Also, I really love your window treatment (curtains) are they double panels (not including the sheer)?
I used to apply the stain and the wipe it down with a rag as recommended…..but I didn’t like that technique. So now, I apply a nice coat of stain on it and let it dry for a day. Recently, I’ve been doing two coats of stain. I always wear latex gloves and use a cheap 3″ foam sponge brush that I throw away afterwards.
The curtains are single panels from Pottery Barn (that was my big splurge last Christmas for Ellie) and the sheer panels are from Target. The dining room was one of the first rooms we designed together. Ellie posted about it on our old blog here; http://web.me.com/tomsibiga/Site/Home/Entries/2011/3/22_In_Love_with_Gray_-_And_Our_Dining_Room.html
Hope that helps.
Hey Tommy,
This is absolutely awesome and I am so going to be doing this…however when I clicked on your plans for this project it gives me a 404 Page Not Found!! Can you repost them or send them to my email address?? Thanks
Mike
The blueprints for the table can be found here; http://tommyandellie.com/?p=1693
Let me know if that link works.
Hey Tommy,
Love the table. Just a couple questions on this. How do the supports under the table work? I might not be reading what you wrote quite right in the instructions, but I just can’t figure out how you have them atached to the table and all. Apparently I missed something
Also, the kreg jig… I’ve never used one before, is it hard to get used to and are there different sizes of them? If so, what’s the size you’ve found out to work the best. If you want to email me the address is theschweitzers@me.com. Thanks
Garrett,
The supports and aprons are all attached using pocket holes and pocket screws. The Kreg jig allows me the capability of strategically placing holes for screws on the inside. My wife bought the system for me for my birthday and I was definitely confused by it at first, but I watched the DVD (included), and was good to go. Here’s the one we bought; http://www.kregtool.com/Kreg-Jigreg-Prodview.html
So to attach the supports I drill two holes on each end of the 2 x4….it’ll look a lot like this; http://www.kregtool.com/prodimages/k4-posed.jpg and those will then screw into the side aprons. Later on when I’m attaching the tabletop, I’ll just screw straight through the 2×4 and into the 2×12″ planks from the underneath.
It’s kindof hard to explain in words but is any of that making sense? I have a semi-finished table in my garage right now that I could take some pictures of if you like. Just let me know.
Hi Tommy,
This table is amazing and I would love to build it for my wife as a Christmas present. Can you send me the plans that you used? The link that you used in the October 17th post above doesn’t work. My email address is cardif_giant@hotmail.com.
Thanks a bunch, I love your work.
I to am going to be building this table. It is absolutely beautiful. A couple questions for you. Would you mind send me your plans because I actually need the same size you made here? My email is wc2783 at yahoo dot com. My dining room can hold that size and maybe a little wider, we will see though. Also, I saw on the Ana design that the leg braces were notched out on the inside but you did the outside, why? Did it give your table more support because I would think the inside would do that? Thank you for your help. And keep up the awesome work.
Tommy, Thanks for your swift response. Your remarks actually help me with another problem that I hadn’t fully considered yet. So that’s a positive! I reread my first question and see now that I wasn’t entirely clear with my inquiry. My concern is about where the table top rests on the 4×4 legs. From studying the pictures it almost appears that the outside 2×4 stretchers (to which the 2x12s and 2×8 breadboards are secured) rest against the legs, and that the breadboards rest on the top of the 4×4 legs. in the blueprint, it looks like you might have used a triangular support strut. How are these items secured> This is the immediate problem I’m trying to solve. Thanks again for your help.Regards,
Tommy, Amazing table. My wife and I are looking to build something similar, with minor modifications, but I was wondering if it would be possible to get your plans? I have never used the kreg jeg before, so that is the major part I don’t understand, how and where you put the holes. I want to do like you did and minimize the amount of screws/holes on the actual table top. This is my first real build, I’m a bit nervous, but excited. Any help would be great. my email is krafty237 at gmail dot com. I love the site, it’s great and you have done some amazing work.
Love it! I also like the distinctive parts. One of a kind!
Brad,Nope….there’s no notch at the top of the table legs. The tabletop just sits ontop of the 4 posts.
Love the table my question is did you notch out the top of the 4×4 legs to set the top on?
Thanks everybody. The pictures don’t do it justice….in some areas in makes it look a lot more contrasted then others…and up close you can see all the distinct marks. The most common question when folks have seen it is…..”Where did you get that wood?” The response….”I made it.”
That’s amazing, Tommy!
This table is amazing! And your chairs are great too! I noticed you covered them! Are you able to tell me more about the extentions? Are they secured with any hardware or do they simply just slide in and remain in place? Do you recall the measurements for the sliders on the extentions? Thanks so much!
Thanks Kevin. I appreciate the kind words.
Nicole—-The extensions are just two 2×8″s screwed together using my Kreg jig. I intentionally spaced out the underneath 2×4″ supports of the table as close to the center as I was comfortable with to allow for the maximum amount of support for the extensions. The extensions just slide right in and it’s a nice tight fit. The 2×2″s stick out a total of 24″ and I believe their total length was 36″ with a 45 degree cut on end. One other thing that I noticed about the Restoration Hardware table (I didn’t do this) was to include another 2×2″ in between the 2×2″s on the extension. This will help align the extension to slide right in. I may add this feature later.
Hi! My husband and I love your site, we found it through Ana White. We are starting our dining room table today and yours is our inspiration! If you would be so kind to answer the following…we need as much help as we can get!Did you use any polyurethane on the table anywhere? or just the briwax? Did you use any wood filler where screws are? If so any trick to staining or finishing after?
The Grups,Thanks for stopping by and commenting. To answer your questions….I only had 4 small screw holes that needed to be filled (one on each leg connecting to the 4×4 stretcher…they were hardly noticeable but i put a little there anyways and then just laid the stain on thick into those holes….I also used a pocket hole on the underneath to attach the leg to the stretcher)…..everything else was strategically hidden pocket holes in spots that can’t be seen. The hardest part there was the breadboards. Essentially my entire tabletop is one piece and the base is another. I centered the entire tabletop onto the base and then clamped it down and screwed evrything in from the underside. On the bench I countersinked two screws for the 2×4″ stretcher but didn’t wood fill those. I haven’t used any poly on the table but was planning on using it on the base. I did two coats of poly on the bench and no briwax. My plan is to use the briwax once a year on the tabletop. Briwax also recommends some sort of sanding sealer that you put on before applying the wax….I didn’t do that…but it says for improved shine and durability to use it.Hope that helps and feel free to let me know if you have any other questions.
Hello,I followed Ana’s example and allowed for a 1″ overhang on both sides. So the tabletop is actually 44″ wide and the stretchers are approximately 42″. The long 2×4″ stretcher is approximately 88″.Hope that helps. Thanks for the positive comments.
Hello, I was just wondering that since your table is a bit wider than Ana’s table, did you make the support for the stretcher wider? As in, did you increase the length at all (in addition to making it stick out a bit at the ends? If so, what did you extend it to? Thanks and gorgeous job!
Outdoor Table;Absolutely. I’d just space them out a little ( maybe use a paint stick as a spacer). I’d probably put the boards bark side down so that water doesn’t pool ontop. I originally found out about Briwax from a family member who uses it on their outdoor (screened in porch) table….so I think you’d be alright using that or any outdoor varnish. Thanks for the comment and I’d love to see/hear how it turns out.
Beautiful! To implement this table in an outdoor environment (covered, screened-in porch) would you suggest simply adding an outdoor varnish and perhaps leaving space between tabletop boards for “movement”?
Jon,I mean…..if you have the two 2×2″s coming out of the extension, I’d add another one perpindicular to those (and connecting the two together) about an inch from the edge of the extension that will butt up against the table. So in essence, you’re 2×2″s will make a long “H”. Does that make sense? I apologize if im not explaining it well….i just noticed on the underneath side of the Restoration Hardware table…thats how they did it.
Tommy,Awesome table! One question on the extension,When you say you would add an extra 2×2 to align the extension easier,Do you mean just adding a 3rd 2×2 for support or something different?God blessJon
Tommy,I think I understand and am going to build our table soon, with the extensions inspired by you.I was considering using just a colored briwax, like a dark walnut or something like that. Do you think I could get away with just that wax for color and finish or do you think I would also need a dark stain before applying the waxThanks againJon from Florida
Everything except the 4×4″s is yellow pine from a local mill. The 4×4″s are fir. If I had to do it all over again, I would insist that everything is kiln dried pine. I called around several mills lately and only found one that could do it for me.Disclaimer: 4×4″s really up the cost of the project and are harder to find. If you are going for an inexpensive table I would just use two-2×4″s sandwiched together.
Tommy,What species wood did you use?
Jon,The next project that I’m going to do, I’m going to only use a colored Briwax (rustic pine is what I’m going to go with…..also I’d buy it from amazon they’ve got it for $15)….so I definitely think you can do it…but I haven’t done it yet, so no guarantees. Glad to be an inspiration…we’d love to see/hear how it goes so keep us posted.
Beautiful table!! I have been working on our version of ana white’s table when I saw your photos. Gorgeous! This is table is my first and & we don’t have all the right tools, but so far, so good. Just wanted to say you did an amazing job and I’m inspired! W shortened our table to ~5′. We used DougFir kiln dried 4×4′s also, but things would have gone much quicker with the right equipment! Tapered the outside edges a little too. We are new to all this, so we ended up using DougFir KD for the rest of the table also. Some people are saying that might not have been the best idea…but we are too far into it to stop now. We are distressing it tomorrow…I can’t wait to beat it up! Thanks for posting the blog, it was very helpful. My biggest concern now is the woodm, but it’s all cut, so I’m not bringing it back! Thanks again for the pictures!
Jen,I wouldn’t worry about the wood too much….the important thing is that it all matches. Since everything else is fir, you should be good to go. It’ll take stain differently, so you’ll definitely want a test piece to try out first. I’m not sure why others said not to use fir….it’s a good hardwood. Good luck with distressing your table. We’d love to see how it turns out!
First of all, you and your wife are such a cute couple.
Next, I love your table. My father is building me one for my dining room and I can’t wait, we are following your changes and Ana Whites plans. I was wondering what color your dining room walls are, the color looks like it would be a good contrast to my new curtains I just made. Thanks.
Tommy, I am not sure if my last comment went through or not. I was wondering if you had a copy of your plans with all the cuts that you made. I really want to use the 2×12′s that you did, but that makes the table wider than Ana’s design, therefore, leaving all of the premeasured cuts she has in place incorrect. It would be greatly appreciated. My email address is:jennifer dot macneil at hotmail dot comThank you and God Bless, Jen
Jen,Thanks for the nice comment. The paint color is called “Mushroom” by Martha Stewart. We tried out a couple of grays and we love this one. Good luck on your table and hope you love it.
Distressing the Wood,Thanks for the incredibly encouraging comments. To distress the wood, I go through a series of different hitting/pounding of various things around the house. I use some chain links, a screwdriver, a hammer, and a coarse threaded hook. I randomly hammer those things into the wood. I strategically chiseled away at the knot in the wood and sanded it all down to give it the weathered look. I also pounded some of the pieces against the concrete. No real wrong way….just have at it. My preference gears towards the subtle side.Hope that helps….good luck.
Your table is beautiful! We have a small dining room and so I have been wanting to build table that I could add length to for all our company. This is perfect. I love the extensions. How did you distress your wood? I love the character pictures. They look great! I also love the Parsons chairs with this table. Rustic, classy and so utterly gorgeous. Great job!
Wes,I’ll forward an email with some jpegs of my measurements. And to answer your question about the notch on the outside…..I chose that way simply because I think it looks better on the outside and that’s also how the Restoration Hardware table does it. Thanks for stopping by.
The table looks great. Just wondering if you used kiln dried 4×4′s? Also would you mind emailing your plans? My hubby and I love the larger planks and the extensions. My email is jojoross(at)gmail(dot)com.Thanks!
My wife and I love your table. We’re going to use your photos to supplement the plans from Ana’s blog and create a hybrid of our own. I did have a request, however. Can you describe or show in photos how the 2×4 stretchers mate with the 4×4 legs? I’m interested in the joinery there. Did you notch out the top on each side or use a Kreg jig to secure the frame?Thanks in advance of your reply.
Jon Dover,If I’m understanding your question correctly, the 2×4 bottom stretcher that spans the entire length of the table is attached to the 4×4 stretcher by two screws on the underneath side. It’s notched into the 4×4 real precisely and is tight enough to barely need screws. Just in case….the 4×4 stretchers are attached to the 4×4 legs with one Kreg screw on the underneath side of the stretcher and then 2 countersinked screws on the inside of the table legs. Those are the only screws of the whole table that can be seen, so I put wood putty over them and stain them as best as I can. Hope that makes sense and helps you out. Good luck!Tommy
Jon,I was considering using corner braces but haven’t on any of the tables I’ve built. The 2x4x35 and the 2x4x38 have a couple Kreg jig holes spread out and then I even hide a Kreg hole in the 4×4 legs in the small gap between the outside end apron (2x4x35) and the inside one (2x4x38). That way the breadboard is tightened down as well as the ends of the 2×12″s. The breadboards are joined together with the 2×12″s with Kreg holes as well.I’ve built additional identical tables since this blog post so I’ve learned some better ways of doing things so the pictures may not be exactly representative of my suggestions. I’ve got another table just about finished if you want some pictures of anything specific….just let me know.
you’re on apartment therapy re-nest today http://www.re-nest.com/re-nest/interior-design/make-your-own-farmhouse-table-our-contemporary-home-158535
Just wanted to add my request for your plans too. I have had this table on my list of too do’s, but I’ve been contemplating the extensions and am happy to see someone else figure it out. Love the great job you did! sheayork at yahoo dot comThanks for your inspiration (came across you on pinterest)
Shea,I created a separate post for the plans that I use when building a table. It’s not the most detailed so feel free to ask any questions that you might have. The link is; http://www.tommyandellie.com/Site/Home/Entries/2011/9/25_The_Blueprints.htmlThanks
Tommy,
I love the table that you built. I want to build the same. I saw that there is a link to the blueprints (Or build directions) but the link is broken. Do you have a new link?
Thanks.
Broken link: http://www.tommyandellie.com/Site/Home/Entries/2011/9/25_The_Blueprints.html
This link should work; http://tommyandellie.com/?p=1693 but just in case I emailed you some .jpegs.
Thanks for the comment and hope it helps.
Lola,Sweet! Thanks for sending the link….fun to be an inspiration for others.
This is unbelievable!!!