Closet Renovation. Adding New Wooden Shelves
So….this is potentially a lame post but I thought I’d put it out there in case it helps other’s in a similar situation. I’m a big fan of making things as functional as possible and one of the things that wasn’t quite working for me is the closet in our soon-to-be nursery. It previously just had one small wired shelf with clothes rack in a fairly large closet space. I wanted to increase the amount of things the closet could hold since it was going to be taken over in a short period time with lots of cute mini-me clothing.


I went to Home Depot and picked up all the supplies needed (about $70 worth). I bought 1″ dowel rods, two shelf/clothing rack brackets, 3: 8′ pieces of primed 1×3″, brackets to hold the dowels on the end, and 2: 6′ pieces of MDF shelving. Our hope is for our little Tucker man to use this closet well into his teen years…so I measured the average height of my shirts to determine the spacing that I needed between the bottom shelf and top shelf. I came up with about 36″ which meant the top part of the shelf in my case needed to be 39″ from the floor for the bottom shelf and 79″ for the top shelf.
To start, I made my marks at 39″ and 79″, drew a line across the wall at those marks, and then used a stud finder to locate and mark where the studs landed on that line. I then cut the 1×3″ to the width of the wall and screwed those into the studs while keeping it level with my marks. For the side pieces, I followed the same procedure to locate the studs and determine the length needed. The side pieces only needed to be about 13″ but I wanted them to end on a stud so for the left side of the closet it came out to about 17″ and for the right side it came out to about 19″. For the side pieces, I cut the ends at a 45 degree angle to make it look a little cleaner. I made sure those were level and screwed them into the studs.

Next up was mounting the shelf brackets. I tried to get these as close to the middle as I could but it was more important that I screwed into a stud then be in the center. Luckily my stud was within a couple inches of the center so it’s hardly noticeable. I cut a scrap piece of 1×3″ to go vertically where the bracket was mounted.

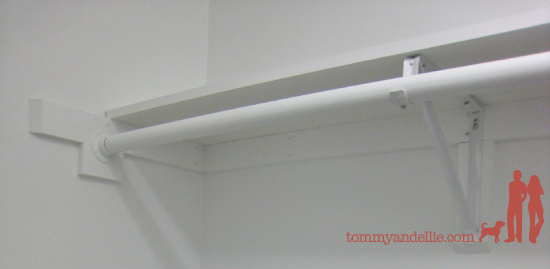
Next up was cutting the dowels to width and then figuring out how to install the end cap brackets. This was tricky but ended up figuring a way to hold it in position, while checking for it to be level, and then making marks for the bracket holes. I also needed to add a piece of scrap 1×3″ to create an even mounting surface for the brackets. *big tip…I thought I was being slick by saving money and buying 1×3″s, had I bought 1×4″s I wouldn’t have needed to add these weird little scrap pieces…live and learn*


I then cut my MDF shelving down to size and test fitted it.
I originally bought it all in white because I was just going to install it and then walk away….however, I wasn’t quite satisfied with the finished product so I ended up spackling the old holes and painting the whole closet with some white that we had laying around. I’m really glad that I painted! It feels so fresh and so clean now.
All that’s left is a bunch of cute boy clothes. If you have any that you want to hand down to us….we’ll gladly take them!


Spread The Love, Share Our Article
Trackbacks
There are no trackbacks on this entry.

Comments
There are no comments on this entry.